Setup Pixel
1. For Shopify sellers
- Click the Active Now to activate the Pixel.
![]()
- Go to the Shopify App to turn on the EAC theme toggle and save it to activate your TikTok Pixel for tracking your ads on TikTok and "Save"
![]()
Now, your Pixel is active:
![]()
- This is the interface when you have created a pixel successfully
![]()
- In case you missed that activating pixel setting step, you can go to the "Pixel" tab, the system will show the popup and you can click "Active now" again.
![]()
2. For non-Shopify sellers
After signing up and updating your information successfully, in case you want to set up a pixel, you can click on the Pixel tab >> Click Add new
![]()
You have 2 options:
- Manually set up
- Automatically set up
![]()
Manually set up Pixel
- Select your Event type and fill in your URL contains (enter the keyword within your URL)
- Click on +Add Events to select more event types
- Click on Update to save it.
![]()
Automatically set up Pixel (Shopify pixel)
- After connecting to Shopify successfully >> Select your Event type
- Click on Update to save it
![]()
Note: If you choose this option, you need to connect your Shopify store to our system first.
![]()
- Input your store name >> click Add store
- Our system will redirect you to your Shopify account. Please check here for more details.
![]()
3. For WooCommerce sellers
Step 1: Copy Pixel ID
- On the homepage of the Ecomdy platform, click "Pixel management", choose "Automatically set up Web events via Partner Platform", and then click "Next"
![]()
- Choose "WooCommerce" icon, click "Next"
![]()
- Click the "Copy" icon or manually copy the text in the "Pixel ID" field. This Pixel ID will be pasted into the Ecomdy Pixel plugin (see step 3).
![]()
Step 2: Install Plugin Ecomdy Pixel
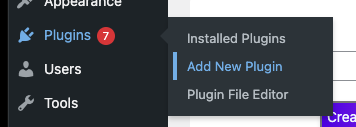
On your WordPress site, click "Plugins" then select "Add New Plugin"

Enter "Ecomdy Pixel" into the search box.
![]()
- Choose plugin "Ecomdy Pixel"
![]()
- Click "Install and Active"
![]()
You have successfully installed the Ecomdy Pixel plugin.
Step 3: Install Pixel
- On the WordPress, click on the "Ecomdy Pixel" icon, then select "Add New"
![]()
- Enter "Pixel Name" and paste the Pixel ID you copied in step 1, then click "Create Pixel"
![]()
You have successfully installed the Pixel for your website. The plugin automatically tracks essential WooCommerce events, such as ‘ViewContent’ when a product is viewed, ‘AddToCart’ when a product is added to the cart, ‘InitiateCheckout’ when starting the checkout process, and ‘Purchase’ when completing the order. The tracking is implemented in JavaScript and seamlessly works with TikTok Pixel.
Only when your campaign is approved, the Pixel will be activated on your website.